CRASH COURSE OF PROCEDURES IN SKINNING AND MOUNTING BIG GAME
2.
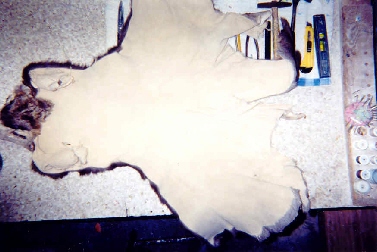
This is what the cape (head skin) looks like after it has been taken off of the skull and neck of the carcass and salted. Let the taxidermist skin the rest of the head - from the antlers to the tip of the nose detaching cape from skull - their are vital areas NOT to cut: eyelids, tear ducts, nostrils & nose.
Let the taxidermist turn the ears inside-out.
1.
When the hunter is in the field he should cut the cape (head skin) off in this manner. DO NOT cut the cape/skin off any closer up the neck than illustrated here - back behind the front legs is even better. Leave the taxidermist enough for a full shoulder mount!
(Above Picture)
3.
The cape (head skin) is shipped off to a professional tannery that specializes in tanning for the taxidermist in mind. On average it takes about 3 months give or take a month for the tanned cape to come back to us ready for mounting.
4.
Before we throw away the old carcass we take measurements of it. It might be measurements for a head, lifesize or rug mount. Then while we are waiting for the tanned skin to come back from the tannery we are ordering the proper form, glass eyes & earliners. NOW... IF the species has antlers or horns their are few extra things we do to prepare the form before the tanned skin arrives.
(Above 3 and Right Pictures.)
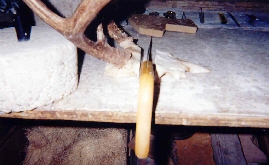
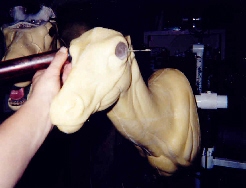
5.
Again now that we are waiting for the cape to come back from the tannery, and we have ordered and received our customers mannikin/form the first thing we do is attach our form to a mounting stand so we can work on it in just about any angle. We rotate pipes to work on deer/elk in just about any position then tighen down and lock the position we want to work on the specimen by screwing in the handles. We can turn the form upside down, right side up, left sideways, right sideways, or even at a off angle to work on some portion of the hair or sewing that needs to be worked on at an odd angle just by loosening the rods rotating the specimen and retighening the rods.
(Right 3 Pictures)
We then set on the form is whats called...
Setting the Eye Angle.
This is the where we want to re-create a solid base in the forms eye orbit to the exact cant and eye angle settings of the original live deer/elk/moose eyes. So when we set our glass eyes in against that base they will be at the right angle and depth. A listing of the correct degrees of each species of wildlife is supplied by some taxidermy companies for the 1. Cant Angle (form is plumbed facing forward) - and 2. Eye Angle (form is plumbed facing the ceiling) How do we know the correct degrees of angle?? By a special circular level that

6.
After the eye angle putty has set hard; we next cut off the excess top of the skull bone to match the top flat area on the form. The top half of the eye sockets are still visible on the skull bone. They must match and be right at the top half of the eye socket on the mannikin - not to far forward or back and not to far high or low - matched as close as possible to forms upper eye sockets position.
(Above 2 Pictures)
7.
After the antlers or horns have been tested for proper fitting on the mannikin they are screwing into the top of the form. Buck/Bull forms (male) come with the top of the form cut off flat because the top of the skull bone will occupy that space now along with a little plaster to take the place of the meat that was once there also.
(Above 3 Pictures)
8.
The last step in preparing your form/mannikins for mounting is to plaster the top of the head. This takes the place of the little meat and muscle that was there. There was not much meat on top of the skull plate but their is around the sides of the skull top just behind both antler bases.
(Above 2 Pictures)
THE SKINNING AND FORM PREPARATION PROCEDURE...
PUTTING THE SKIN ON THE MANNIKIN
THE MOUNTING PROCEDURE...
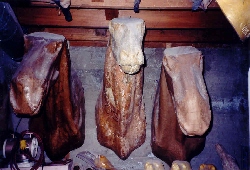
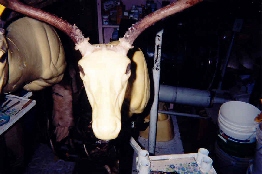
1.
The tanned Mule Deer cape (head skin)
(Left Picture)
has now arrived back from the tannery. The
(Right Picture)
is a tanned elk cape. The tanned capes have come back to us in a
DRY
tanned state. The tannery has turned them into leather with the hair on. They have been very careful NOT to shave or cut off the delicate parts of the capes like the eyelid hairs, eyelid skin, the chin wiskers, and ear hairs, nose & nostril skin. We have folded most of the
skull skin
back over the rest of the tanned elk cape to show you the lips, eye lids, nose, nostrils & tear ducts are left on the cape from when we skinned the specimen; they are skin and are tanned and preserved along with the rest of the cape.
(Above Right Picture Elk)
IT NEEDS TO BE UNDERSTOOD THAT THEIR ARE AS MANY DIFFERENT TECHNIQUES IN MOUNTING BIG GAME HEADS AS THEIR ARE TAXIDERMISTS.
The general procedures are the same. But in the mounting and especially in whats called the FINISHING STAGE techniques vary widely. What paint to use; how to apply it; what combination or single color(s) to use for life likeness in restoring the eyelids, nose, nostrils and tear ducts?
CLICK ON MANNIKIN PICTURES TO THE RIGHT FOR NEXT PAGE OF MOUNTING PROCEDURES. ------------------>
2.
BEFORE any actual mounting on the mannikin can be done the cape (Mule Deer Above - as well as any returned tanned cape or lifesize tanned fur) has to be hydrated in plain cold water overnight. (Notice the difference in color from these hydrated capes from the dry ones above.) The dry tanned cape cannot be mounted on a mannikin until it is relaxed. The nose, nostrils, tear ducts, eyelids and ears are all stiff and unmanagable and unmountable on a form or mannikin until hydration is done.
(Above 2 Pictures)
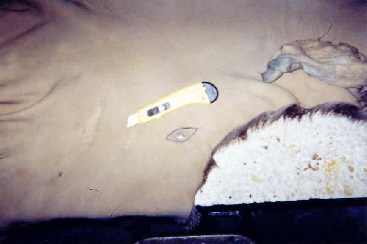
3.
The next step is to look over the cape to see if their is any holes made by the skinners knife or bullet holes to repair. We do have 1 hole to repair.
(Right Picture)
If a bullet hole had cut part of the hair off entering into our game then we need to carefully cut off the hide that that sliced hair is attached to. We must make a clean cut so that when it is sewed together you can't see our hole; notice the marked football shaped black marker line. We will cut that piece out and remove it. Sewing the hole back together will leave no trace of the hole that was once their when viewed from the hair side.
(Above Right Picture)
Back
Next